

Quite often I get comments on my photo-collages.
"How did you do that...?"
"What programme do you use...?"
So here's the answer to your burning question...
How I make Those Cool Photo Collages.

Beautiful wonderful easy-to-use, free-to-download Photoscape.
I am so sorry if you are a Mac user. I cannot help you because... finally there's something Windows has that a Mac doesn't!
Photoscape is only for Windows. Sorry. Take that up with the designers. Because really? I've looked around and there doesn't seem to be anything else with Photoscape's features. For Mac. Or Windows.
It's the best photo editing programme Ever.
So go download it for free here, Windows users.
Mac Users. I'm sorry. I got nothing for ya. Head on back to camp.
{Sorry I've been watching Survivor. Got a little carried away...}
Collages are not only useful and beautiful in Blogs - but can also be used to make the most gorgeous printed PhotoBooks. So even if you're not a blogger, keep reading. Photoscape could come in really handy round Mothers Day...

After you install Photoscape open it up and you will land on the above screen.
The three most important features are...
- Editor: Lets you edit photos individually. Make them black and white, sepia, correct exposure, add frames, film effects, vignetting etc to photos individually.
- Batch Editor: Lets you edit a bunch of photos at the same time. You can resize, apply a frame style, or a watermark, or a film effect to all the photos you want to use in a post. At once. A beautiful beautiful tool. I use this function on all the photos I plan to use in a post.
- Page: This is where we make our fancy photo collages. Choose a layout, drag and drop photos into it, apply a frame style (e.g. rounded corners, vignetting) to the collage. Then save and upload it as a single photo. Too easy.

1. Editor
Here you will find all the tools you need to make your photos look special. You don't need to have a fancy camera to have your blog's images look amazing.
- First up, Resize. Find out how many pixels you need your blog images to be. Resize every photo to this size as soon as you get into Editor. (Click on the "Resize" button and a window will pop up where you can just type in the pixel width you want). Why do this? Because you'll have shorter upload times. And use up less storage space. And make your blog page loading time much faster. That's why.
- Next, click on the "Bright,Colour" button. Click, don't use the arrow/drop down menu. Clicking will bring up all the controls in a slider menu. All you have to do is play around with them until your photo looks how you want it. If you mess up, just Undo.
- Filter is where the fun stuff is. "Film Effect" lets you choose all kinds of cool and vintage photo styles like Cross Process or Agfa, Provia etc. (Don't like it? Undo!) Then there's Antique photo. Add cool scratchy textures to make your pics look ancient (and disguise a boring image). Vignetting adds a touch of class; a bit of shadowing round the edges. There's other arty effects too; like turning your photo into a pencil drawing. Just have a play and discover all you can do.

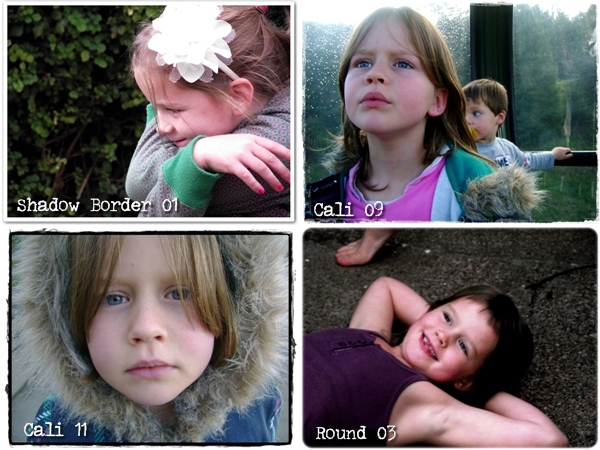
- Don't forget a Border. Even if you don't want anything fancy, why not just simply round the corners? Or add a shadow? (You'll need to make sure you don't have any borders selected on your Template Designer or it will look funny) My favourite right now is Round 03. It gives a softly rounded edge. Nice.
2. Batch Editor
Everything you can do in Editor, you can do in Batch Editor. Pretty much. Except that you do it to a bunch of photos at once, instead of just one at a time. This is a great tool for blogging. I can choose all the pics I might want to use for a post; resize them altogether, add a border and photo effects... and if I want to, a Watermark.
A Watermark is what you see on some people's photos which lets you know they own the photo. Stops people from right-click copying your images without giving proper attribution. Like this...

So if you are concerned about people pinching your pics, you can easily add a watermark in Batch Editor.

In Batch Editor click on "Object" as shown above.
Can you see where the arrow is pointing, top right?
Can you see where the arrow is pointing, top right?
Then select Text 1, 2 or 3 (check the box)... and edit the text and style by clicking on the little pencil next to it. See where I've written: "click to design watermark"? The arrow is pointing right at it.
Play around until you get it looking right on all the photos in the batch. When you are happy with it click "Convert all" and follow the prompts to save your files.

See? A nice batch of vignetted, round cornered, brightened, contrasted, watermarked photos.
Put into a collage.
Which is what you've been waiting for. Here we go...

3. Page (a.k.a. Collages!)
Collage-making in Photoscape is so simple.
Choose a layout from the list on the right.
Choose your photos from the list on the left (browse your computer)
Drag and Drop the photos into position.
Don't like it? Choose another layout. Or drop in a replacement photo.

So many uses for collages. So many layout options!
- You change the size (in pixels) of the collage and its proportions by clicking on the acorn icon next to the "size" indicator. Play around with the percentages and proportions until it looks right. If you use extra-large photos in your blog layouts, your photos will need to be at least 600 pixels wide (150%)
- You can add frames to give your photos an interesting edge. The best frames are the simple ones. Rounded or the rough-edged "cali" frames work best in collages.
- You can increase or decrease the margin between photos, depending on what look you're going for.
- If you want to give your collage a frame just around the edge (like in my collage at the top of this post), choose "No Frame" in the collage page. Then click "Edit" and add your border there, just to the outside. This is also where you add text.

Technical Tips:

5. In "filter" you will see some basic controls for exposure and effects. But I recommend doing any photo editing before making your collage. Just whatever you do, don't apply any frames in "edit" before bringing your photos in!! It will make your collage very messy with some frames being cut off in odd places.
***Vignetting tip: You can apply "vignetting" in "filter" which gives a nice internal shadow to each image's corners. Quite sweet, especially when using a rounded frame.

Now go and download Photoscape for free. Install and start playing. I look forward to seeing lots of fun collages and cool photos on your blogs :)
IF BLOGGY DIY ISN'T YOUR THING:
If doing this yourself seems too overwhelming, you can always take the easy way out and let me do it for you. Visit my Custom Blog Design page and request either a special custom designed button set (NZ$25) or an extra button in one of the styles pictured here (NZ$5 per button).
I can also create Headers, grab-buttons and even do a complete blog-design overhaul...

{P.S. If you're feeling eternally grateful right now... you can say *thankyou* by Following}
More Blog Tips...
28 comments:
Photoscape rocks, eh? I get asked this a lot too. Great tutorial girly.
Ah, I miss Windows....
But, just to add to your tutorial, I have researched long and hard and found a solution of a sort.
If you buy a program called Parallels, you can run a Windows desktop on your Mac. This is particularly helpful for bloggers, who Mac has incredibly, completely undercatered for.
This then enables me to run Windows Writer, the best blogging platform hands down, and Photoscape. It does also mean, just to complicate things further, that accessing the images can be a tad tricky. Uploading to an online source from Mac and accessing from Windows might be the best option.
It is a drama but once it is all sorted and a system is worked out, it should still give the best of both worlds.
There! I have spoken for the Mac team. We are no longer trudging back to camp defeated!
I have a new catchphrase though. Once you go Mac, you'll ache to go back, if you used to blog. :)
xx
So, now that I have found photobucket, photoscape is a separate thing?? Is it an editing programme only? Man, there is a lot of time to spend on these things aye?
Thankyou soo much for this post and for introducing me to Photoscape - I can see the hours of mucking around with my current editing programme magically disappearing!!
AMAZING! Thanks so much for sharing Photoscape, and explaining it so clearly. Love it. I've been wanting to find something like this for ages and have just done my first (and very quickly too) couple of collages and it is so nice and easy to use. Wahoo!
Amy
oooo this was very helpful thank you Simone!! :)
Very helpful post Simoney! I downloaded photoscape and gimp after your last technical post, both of which I now use regularly but its great to get some tips on bits of photoscape I have yet to explore!
I agree with Little Gumnut, I've already tried out the resize and watermark feature. Awesome!
That is nice! I have never heard of Photoscape, I use Picnik (online - also free) for my collages. Since it is online, even Mac users can play around with it.
Thanks for your visit to the Northwoods on my SITS Day!
Hanneke
Ahhhhhh - so excited, using it tonight as I type this... THANK YOU!!!
I'm so excited about this---I can't wait to try it!!!!!! :)
Thanks for this Simone! Can't wait to try, looks like fun. Have yourself a great weekend!
Thank you for your tutorial! I have uploaded photoscape previously, but I must admit I haven't used it in awhile, this is a great refresher. Thanks for sharing.
I use that too and want to thank you for your first photo Ive never used the 14 photo one and it actually looks really good :)
After reading this post, I downloaded Photoscape and spent a good portion of my long weekend playing with it. I'm going to showcase some of my creations this week in Wordless Wednesday and link to this post as a great tutorial and resource. Thank you!
Have downloaded the program and have already worked with it. Perfect. Followed your instructions and understood everything and was able to do it. Thanks a lot for sharing.
Greetings from Christa
Hi! I'm here from SITS! This is a *wonderful* how-to post! It's very informative, easy to read, nicely broken up with the headings. Just perfect!
Thanks so much for creating this tutorial and linking it over at SITS!
I am so happy to learn of this! Thanks so much for this info!
waaa...I'm a mac-er. But just FYI I have some photo editing fun at picnik.com. It has some of the basics.
Another Picnik user here. :)
Yeah for your blogging tips - I am SLOWLY working my way through them all - :)
Thank You xxx
Another MAC user here but I do have an iPhone so am using instamatic for photo taking a bit otherwise I'm off to check out picnik.
thanks heaps for all the helpful hints
Thank you Thank You Thank You so very much. This post is FANTASTIC. I really do appreciate the time you took in creating it.
I love this. I've looked around for photo collages, but this is the first time I've seen something that will probably work. Thanks so much!
Annie Kate
Thank you!!! This is just what I needed! XXXXXXXX
thanks a lot sir..it is very helpful post..plz sir keep it on. n post some more.thanks in advance.
I'm using it now already and it's great! :) Thank you!
I really cannot express how much I love your blog!! Really, I can't.
Thank you for presenting me PhotoScape, love that!
Please, can you tell me how can I repeat the same edition I did to one photo to others?
Post a Comment